
Pevioous Blog “Sculpting the Shoulders: A Comprehensive Guide to Deltoid Development 1/2“
Front Deltoid: The Key to Impressive Frontal Definition
Seated Dumbbell Front Raise

The Seated Dumbbell Front Raise is a targeted exercise that isolates the anterior deltoids, the front part of the shoulder muscles. This movement is essential for anyone looking to enhance the definition and strength of their shoulders.
Benefits of the Seated Dumbbell Front Raise
- Isolation: By sitting, you minimize the involvement of other muscle groups, allowing for focused work on the front deltoids.
- Posture: Performing this exercise seated encourages a straight back and better form.
- Versatility: Suitable for various fitness levels and can be easily adjusted by changing the weight of the dumbbells.
Step-by-Step Execution
- Starting Position: Sit on a bench with your feet flat on the ground. Hold a dumbbell in each hand with your palms facing your thighs.
- The Lift: With a slight bend in your elbows, raise the weights in front of you to shoulder height, keeping your palms facing down.
- The Peak: Pause briefly at the top of the movement when your arms are parallel to the floor.
- The Descent: Lower the dumbbells back to the starting position in a slow and controlled motion.
Pro Tips for the Seated Dumbbell Front Raise
- Elbow Bend: Maintain a slight bend in the elbows throughout the lift to reduce stress on the joints.
- Controlled Tempo: Avoid using momentum to lift the weights; focus on using your shoulder muscles to perform the work.
- Breathing: Inhale as you lift the weights and exhale as you lower them, coordinating your breath with the movement.
Common Mistakes to Avoid
- Swinging the Weights: Swinging can lead to decreased muscle activation and increased risk of injury.
- Overlifting: Raising the dumbbells above shoulder height can put unnecessary strain on the shoulder joint.
- Rushing the Reps: Take your time with each repetition to ensure maximum muscle engagement.
As you develop strength in your shoulders, you can increase the weight of the dumbbells or add more repetitions to your sets. For those seeking hypertrophy, aim for 8-12 reps for 4 sets, with a rest of 1-2 minutes between sets. If strength is your goal, consider 3-6 reps for 4 sets, resting for 3-5 minutes between sets.
Barbell Front Raise
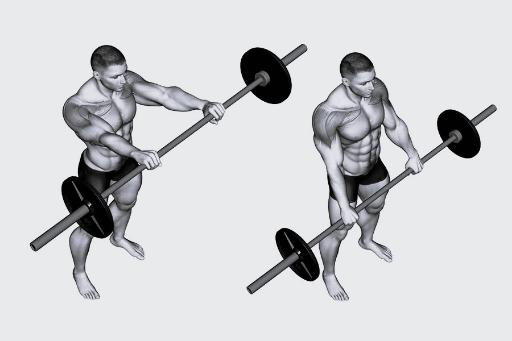
The Barbell Front Raise is a fundamental exercise for anyone looking to build strength and definition in the anterior deltoids. This movement is not only about lifting weight; it’s about creating a symphony of muscle coordination that enhances your upper body’s aesthetic and functional prowess.
Anatomy of the Barbell Front Raise
The primary muscle worked in this exercise is the anterior deltoid, the front part of your shoulder. However, it’s a compound movement, meaning it recruits multiple muscle groups, including:
- Upper Chest: Assists in lifting the barbell.
- Core Muscles: Engage to stabilize your body throughout the movement.
- Upper Back: Provides support and stability.
Mastering the Barbell Front Raise
- Starting Position: Stand with feet shoulder-width apart, holding a barbell with an overhand grip, hands slightly wider than shoulder-width.
- The Lift: With elbows slightly bent, raise the barbell to eye or shoulder level, keeping your palms facing down.
- The Peak: Pause briefly at the top, then slowly lower the barbell back to the starting position.
Tips for Effective Execution
- Grip Width: A slightly wider grip can help target the medial deltoid more effectively.
- Elbow Position: Maintain a slight bend in the elbows to protect the joints and ensure proper muscle engagement.
- Controlled Movement: Avoid swinging the barbell; lift with intention and control to maximize deltoid activation.
Common Mistakes to Avoid
- Using Too Much Weight: This can lead to using momentum rather than muscle strength, reducing effectiveness and increasing injury risk.
- Lifting Too High: Raising the barbell above shoulder height can put undue stress on the shoulder joint.
- Rapid Movements: Fast, jerky motions can compromise form and lead to less muscle activation or injury.
As you become more comfortable with the movement, you can increase the weight or add more repetitions to challenge your muscles further. For those looking to build muscle endurance, aim for higher reps (12-15) with moderate weight. If building muscle mass is the goal, opt for lower reps (6-10) with heavier weights, ensuring you can maintain proper form throughout the set.
Pike Push Up
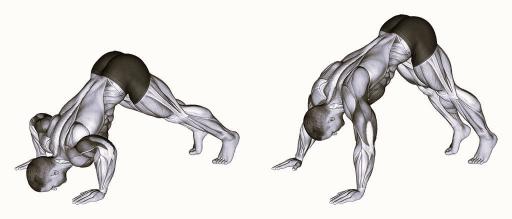
The Pike Push Up is a challenging bodyweight exercise that primarily targets the shoulders, especially the anterior deltoids. It’s an excellent move for those looking to progress towards more advanced calisthenics exercises like the handstand push-up.
Muscles Worked in the Pike Push Up
- Deltoids: The anterior, medial, and posterior heads are all engaged, with the anterior deltoid being the most active.
- Triceps Brachii: Heavily involved due to the increased load on your arms compared to regular push-ups.
- Upper Trapezius: Assists in stabilizing the upper back during the movement.
Performing the Pike Push Up with Proper Form
- Starting Position: Begin in a downward dog position, with your body forming an inverted V-shape. Your feet should be hip-width apart, and your hands should be shoulder-width apart.
- The Descent: Bend your elbows to lower your head towards the floor. Your elbows should be at a 45-degree angle to your body.
- The Ascent: Push through your hands to raise your body back to the starting position.
Tips for Perfecting the Pike Push Up
- Elbow Position: Keep your elbows from flaring out too much to maintain focus on the shoulders.
- Head Position: Aim to touch the top of your head to the ground, not your forehead, to ensure proper shoulder alignment.
- Legs and Hips: Keep your legs straight and hips high to maintain the correct pike position throughout the exercise.
Variations to Increase Intensity
- Deficit Pike Push Up: Place your hands on elevated surfaces to increase the range of motion.
- Decline Pike Push Up: Elevate your feet to shift more weight onto your shoulders and increase the difficulty.
Incorporating Pike Push Ups Into Your Routine
Pike push-ups can be a part of a comprehensive upper-body workout or a focused shoulder routine. Start with as many reps as you can manage, aiming for a set of 10-15 reps. As you improve, increase the number of sets, but be cautious not to overdo it, as the shoulders can be prone to injury.
Lateral Deltoid: Crafting the Curve
Seated Dumbbell Lateral Raise
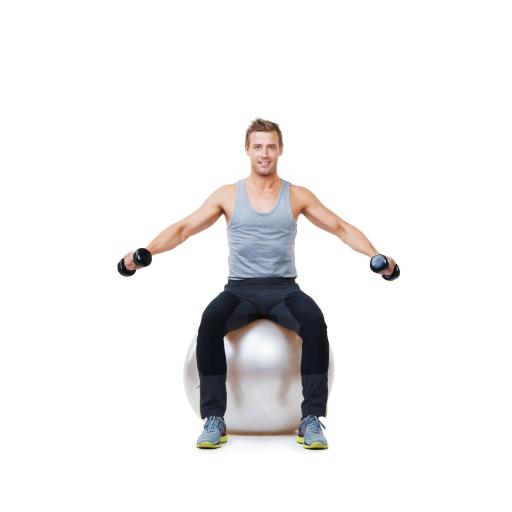
The Seated Dumbbell Lateral Raise is a precision exercise designed to target the lateral deltoids, which are crucial for achieving that sought-after shoulder definition and width. This exercise is a favorite among fitness enthusiasts for its ability to isolate and sculpt the shoulder muscles effectively.
Anatomy of the Seated Dumbbell Lateral Raise
When you perform the seated dumbbell lateral raise, you primarily engage the following muscles:
- Lateral Deltoids: The main target of the exercise, responsible for lifting the arms to the side.
- Trapezius: Assists in the movement, especially the upper fibers.
- Supraspinatus: A rotator cuff muscle that aids in the initial phase of arm elevation.
- Serratus Anterior: Stabilizes the scapula.
- Forearms: Engaged to maintain grip on the dumbbells.
- Core: Activated to stabilize the upper body during the lift.
Executing the Seated Dumbbell Lateral Raise with Excellence
- Starting Position: Sit on the edge of a flat bench with your feet flat on the floor. Hold a dumbbell in each hand at your sides, palms facing in, and elbows slightly bent.
- The Lift: Exhale as you raise the dumbbells out to the sides, maintaining a slight bend in your elbows until your arms are parallel with the floor.
- The Peak: Pause at the top of the movement for a moment to maximize deltoid engagement.
- The Descent: Inhale as you slowly lower the dumbbells back to the starting position, keeping the tension on the lateral deltoids.
Pro Tips for the Seated Dumbbell Lateral Raise
- Posture: Keep your back straight and chest up throughout the exercise to ensure proper form.
- Elbow Bend: Maintain a slight bend in the elbows to protect the joints and focus the tension on the deltoids.
- Mind-Muscle Connection: Concentrate on the lateral deltoids as you lift and lower the weights to enhance muscle activation.
- Controlled Tempo: Move the dumbbells deliberately to avoid using momentum, which can reduce the effectiveness of the exercise.
Common Mistakes to Avoid
- Swinging the Weights: Using momentum to swing the dumbbells up can lead to decreased muscle activation and increased risk of injury.
- Lifting Too High: Raising the dumbbells above shoulder height can shift the focus away from the lateral deltoids to the trapezius.
- Rushing the Repetitions: Perform each rep with control to maximize muscle tension and growth.
To continue making gains, you can increase the weight of the dumbbells, add more repetitions, or incorporate pauses at the top of the movement. You can also experiment with different tempos, such as a slow eccentric phase, to challenge the muscles further.
Machine Lateral Raise
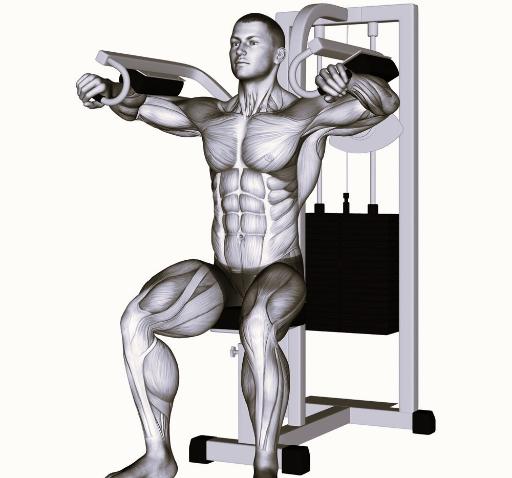
The Machine Lateral Raise is an exercise that zeroes in on the lateral deltoids, providing a stable and focused way to build broader, more defined shoulders. This machine-based movement is excellent for both beginners and advanced lifters looking to target their side delts with precision.
Muscles Worked by the Machine Lateral Raise
- Primary Muscle: The lateral or middle deltoids are the main focus, responsible for abducting the arm away from the body.
- Secondary Muscle: The anterior deltoids also get involved, as they’re activated during most shoulder exercises.
How to Perform the Machine Lateral Raise
- Setup: Adjust the machine to fit your body size and select the appropriate weight.
- Starting Position: Sit facing the machine with your upper arms against the pads and a neutral spine. Your chest should be up, and your head should be looking forward.
- The Movement: Initiate the lift by moving your upper arms laterally, away from the midline of your body, until they’re parallel to the floor.
- The Peak: Pause briefly at the top of the movement to maximize tension on the lateral deltoids.
- The Return: Slowly bring your arms back to the starting position, maintaining control and tension throughout the descent.
Tips for Maximizing Effectiveness
- Posture: Keep your chest up and avoid leaning forward to ensure the lateral deltoids are doing the work.
- Range of Motion: Lift until your arms are parallel to the floor—going higher can shift the focus to other muscles.
- Controlled Tempo: Lift and lower the weights slowly to maintain constant tension on the deltoids.
Common Mistakes to Avoid
- Using Too Much Weight: This can lead to using momentum and other muscles to lift the weight, reducing the effectiveness of the exercise on the target muscle group.
- Incomplete Range of Motion: Ensure you’re lifting the arms to the point where they’re parallel to the floor to fully engage the lateral deltoids.
Progressing with the Machine Lateral Raise
As you progress, you can increase the weight, add more repetitions, or slow down the tempo to further challenge your muscles. For those aiming for hypertrophy, the recommended rep range is 8-12, with a weight that allows you to maintain proper form.
Cable Face Pull
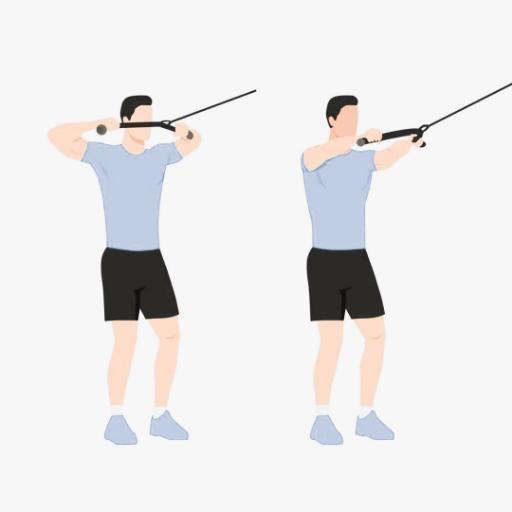
The Cable Face Pull is an exceptional exercise that targets the often-neglected rear deltoids, contributing to a balanced and well-rounded shoulder musculature. This exercise is not only pivotal for aesthetic development but also plays a crucial role in enhancing shoulder health and posture.
Muscles Engaged in the Cable Face Pull
- Rear Deltoids: The primary focus of the exercise is crucial for shoulder stability and backward movement of the arms.
- Trapezius: The upper and middle fibers assist in retracting the scapulae.
- Rhomboids: Work alongside the traps to retract and stabilize the shoulder blades.
- Rotator Cuff: The infraspinatus and teres minor are involved in externally rotating the shoulders during the pull.
Mastering the Cable Face Pull
- Setup: Attach a rope to a cable station set at upper chest height.
- Grip: Grasp the rope with both hands, palms facing each other.
- Stance: Assume a split stance for stability or a half-kneeling stance to prevent leaning.
- Execution: Pull the rope towards your face, keeping your elbows high and out to the sides.
- Peak Contraction: Squeeze your shoulder blades together at the end of the movement.
- Return: Slowly extend your arms back to the starting position, maintaining tension in the rear delts.
Pro Tips for the Cable Face Pull
- Elbow Height: Keep your elbows at or above shoulder level to maximize rear deltoid engagement.
- Scapular Movement: Focus on retracting your shoulder blades as you pull, enhancing the involvement of the upper back muscles.
- Controlled Tempo: Perform the movement with a smooth, controlled motion to avoid using momentum.
Common Mistakes to Avoid
- Overusing the Lats: Setting the cable too high can lead to excessive lat engagement. Ensure the cable is set at face height.
- Forward Head Posture: Avoid jutting your head forward to meet the rope; keep your neck neutral.
- Excessive Weight: Using too much weight can compromise form and reduce the effectiveness of the exercise on the target muscles.
Progressing with the Cable Face Pull
To continue challenging your muscles, increase the weight gradually, add more repetitions, or incorporate pauses at the peak contraction. Experimenting with grip variations, such as pronated or neutral grips, can also introduce new stimuli to the muscles.
Conclusion
Incorporating these exercises into your shoulder workout routine will ensure balanced development and strength across all three deltoid heads. Remember to focus on proper form and gradually increase the weight to prevent injury and promote muscle growth. Happy lifting!